You want to ensure proper dc axial fan wiring every time. Always pay attention to the wire colors and labels before you start. It’s crucial to connect the wires with the correct polarity and voltage. By following these guidelines and prioritizing safety, you can prevent mistakes from occurring. For additional assistance, refer to datasheets or the manufacturer’s instructions for your fan.
Key Takeaways
- Always look at wire colors and labels before you start wiring your DC axial fan. This helps you connect wires the right way and stops damage.
- A 2-wire fan is easy to use and always runs at top speed. Use this fan for simple cooling when you do not need to change the speed.
- A 3-wire fan has a tachometer wire that lets you check the speed. This helps you find problems early before they break the fan.
- A 4-wire fan lets you use PWM control to change the speed when the temperature changes. This saves power and makes the fan quieter.
- If you cannot tell what the wire colors mean, use a multimeter to check them. This helps you avoid mistakes and keeps things safe.
- Make sure all wires are connected tightly so they do not come loose. Loose wires can make the fan stop working or work badly.
- After you put in the fan, check it often to see how it works. Make sure it runs smoothly and listen for strange sounds.
- Always be careful when you wire things. Turn off the power, use tools with insulation, and check the wire direction to stay safe from shocks.
DC Axial Fan Wire Types
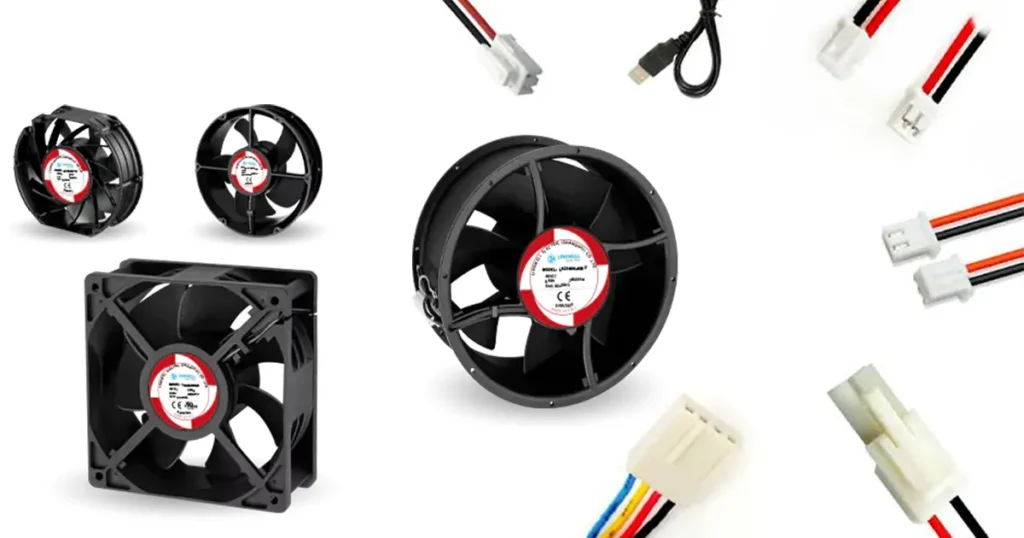
When you look at dc axial fan wiring, you will see different wire setups. Each setup gives you a unique function. Let’s break down the main types so you can spot the differences and know what to expect.
2-Wire Fan Overview
You will find the 2-wire dc axial fan is the simplest. It has just two wires. One wire connects to the positive dc power supply. The other wire connects to the negative or ground. This setup lets the fan run at full speed whenever you turn it on. You do not get any extra features like speed monitoring or control. If you want basic cooling, this fan works well.
3-Wire Fan Overview
The 3-wire dc axial fan adds a third wire. You still have the positive and negative wires for power. The third wire is a sensor wire. This wire sends a signal to your system. It tells you how fast the fan spins. If the fan stops or slows down, your system can alert you. This feature helps you keep track of cooling performance. You can spot problems before they cause damage.
4-Wire Fan Overview
The 4-wire dc axial fan gives you even more control. You get the same positive and negative wires for power. You also have the sensor wire for speed monitoring. The fourth wire is special. It is a PWM (Pulse Width Modulation) wire. This wire lets you adjust the fan speed based on temperature or system needs. You can make the fan quieter when you do not need full cooling. You can also ramp up the speed when your system gets hot.
Tip: If you want to save energy or reduce noise, a 4-wire fan is a smart choice. You can control the speed and keep your system cool without wasting power.
Here’s a quick table to help you compare the wire types and their functions:
| Fan Type | Number of Wires | Functionality Description |
|---|---|---|
| 2-wire | 2 | Basic operation with one positive and one negative wire. |
| 3-wire | 3 | Adds a sensor signal line for monitoring fan speed, allowing for alarms if the fan fails. |
| 4-wire | 4 | Includes a PWM signal line for speed control based on temperature, enabling quieter operation when not needed. |
You can see that each dc axial fan type gives you a different level of control. If you want simple cooling, go with a 2-wire fan. If you need to monitor fan speed, choose a 3-wire fan. If you want full control over speed and noise, pick a 4-wire fan. Understanding these wire types makes dc axial fan wiring much easier and safer.
Wire Color Codes
When you look at a DC axial fan, you will see wires with different colors. These colors help you know which wire does what job. If you connect the wires the right way, your fan will work safely and correctly. If you mix them up, you could damage your fan or your device. So, let’s break down what each color means for 2-wire, 3-wire, and 4-wire fans.
Common Wire Colors and Their Meanings
Here’s a quick guide to the most common wire colors you’ll find:
| Wire Color | Typical Function | Where You’ll See It |
|---|---|---|
| Red | Positive (+) Power | All fan types |
| Black | Negative (–) / Ground | All fan types |
| Yellow | Tachometer (Speed Sense) | 3-wire, 4-wire fans |
| Blue | PWM Speed Control | 4-wire fans |
You might see other colors, but these are the most popular ones. Always check your fan’s datasheet if you see something different.
How to Identify Each Wire
- Red wire: This wire brings power to your fan. Connect it to the positive side of your DC power supply.
- Black wire: This wire is for ground. Connect it to the negative side of your power supply.
- Yellow wire: This wire sends a signal to your system. It tells you how fast the fan spins. You’ll find this on 3-wire and 4-wire fans.
- Blue wire: This wire lets you control the fan speed. It works with a PWM signal. Only 4-wire fans have this wire.
Tip: If you ever feel unsure, look for small labels or markings on the wires. Some fans have tiny tags or print right on the wire.
What If the Colors Are Different?
Sometimes, manufacturers use different colors. You might see white, green, or even orange wires. Don’t guess! Always check the datasheet or manual for your fan. If you can’t find the information, contact the manufacturer before you connect anything.
Quick Checklist for Safe Wiring
- Match each wire color to its function.
- Double-check the datasheet if you see unusual colors.
- Never connect wires by guessing.
- Use a multimeter if you want to test the wires before connecting.
Note: Mixing up the wires can cause your fan to spin the wrong way or not work at all. In some cases, it can even damage your electronics.
When you know what each wire color means, you can wire your DC axial fan with confidence. Take your time, check your work, and your fan will keep your system cool and safe.
DC Axial Fan Wiring Procedures
You want your dc axial fan wiring to be safe and reliable. Let’s walk through the steps for each fan type. You’ll see how to connect the wires, avoid mistakes, and make your installation work smoothly.
2-Wire Fan Wiring
Red and Black Wire Connections
Wiring a 2-wire dc axial fan is simple. You only have two wires to connect. Here’s how you do it:
- Check the voltage rating on your fan. It might say 12V, 24V, or 48V dc. Make sure your power supply matches this rating.
- Find the red wire. This wire is positive. Connect it to the positive terminal of your dc power supply.
- Find the black wire. This wire is negative. Connect it to the negative terminal or ground.
- Use the manufacturer’s wiring diagram if you feel unsure. Double-check the labels.
- Test the fan before you finish the installation. Turn on the power and see if the fan spins.
Tip: Always check the airflow direction before mounting your fan. Most fans have arrows on the housing. Point the airflow where you need cooling.
Avoiding Polarity Reversal
Polarity matters in dc axial fan wiring. If you swap the red and black wires, your fan might not work. You could even damage the fan or your device. Here’s how you avoid polarity reversal:
- Look for clear markings on the wires.
- Use a multimeter to check which wire is positive and which is negative.
- Never guess. If you see unusual wire colors, check the datasheet.
- Test the fan after wiring. If it doesn’t spin, turn off the power and check your connections.
Note: Polarity mistakes can cause the fan to spin backward or not spin at all. Always double-check before powering up.
3-Wire Fan Wiring
Tachometer Wire Function
A 3-wire dc axial fan gives you extra feedback. The third wire is the tachometer wire. It helps you monitor the fan speed. Here’s what you do:
- Connect the red wire to the positive terminal of your dc power supply.
- Connect the black wire to the negative terminal or ground.
- Find the yellow wire. This is the tachometer wire. Connect it to a monitoring port that can read open-collector or square-wave signals.
- Make sure your system can count pulses from the tachometer wire. This lets you track the fan’s RPM.
Tip: If you want to spot cooling problems early, use the tachometer wire. It helps you check if the fan slows down or stops.
Secure Connections
You want your fan wiring to stay tight and safe. Loose wires can cause trouble. Here’s how you secure your connections:
- Use proper connectors or solder the wires.
- Cover exposed wires with heat shrink tubing or electrical tape.
- Keep wires away from moving parts.
- Mount the fan firmly. Use screws or clips to hold it in place.
Alert: If you see the fan wobble or hear strange noises, check your installation. Secure the fan and wires right away.
4-Wire Fan Wiring
PWM Control Wire
A 4-wire dc axial fan gives you full control. The fourth wire is the PWM control wire. It lets you adjust the fan speed without changing the input voltage. Here’s how you wire it:
- Connect the red wire to the positive terminal of your dc power supply.
- Connect the black wire to the negative terminal or ground.
- Connect the yellow wire to your system’s monitoring port for speed feedback.
- Find the blue wire. This is the PWM control wire. Connect it to a controller that sends pulse width signals.
The PWM wire receives signals from your controller. The fan’s circuit board reads these signals and changes the motor speed. You can make the fan run faster or slower as needed.
Tip: PWM control helps you save energy and reduce noise. You don’t need full speed all the time. Adjust the fan speed for better temperature management.
Monitoring and Speed Control
With a 4-wire fan, you get precise speed control. The PWM wire lets you set the RPM based on system needs. Here’s what makes it special:
- The PWM wire tells the fan how fast to spin.
- Your system can change the signal to match the cooling demand.
- You get quieter operation when you don’t need full cooling.
- The tachometer wire still lets you monitor the fan speed.
Note: 4-wire fans are great for installations where you want to balance cooling and noise. You can fine-tune the fan for every situation.
Practical Tips for DC Axial Fan Wiring
- Always check the voltage and polarity before wiring.
- Mount the fan so airflow goes where you need it.
- Secure all connections to prevent loose wires.
- Test the fan after installation to make sure it works.
- Use the datasheet for your fan if you see unusual wire colors or need extra help.
Callout: Good installation keeps your dc axial fan running smoothly. Take your time, check your work, and enjoy reliable cooling.
DC Axial Fan Cooling Optimization
Mounting for Airflow
You want your dc axial fan to deliver maximum airflow and keep your system cool. Proper mounting makes a big difference in cooling performance. If you install the fan the wrong way, you might lose a lot of airflow and your system could overheat. Let’s look at some mounting techniques that help you get optimal performance:
- Align the airflow direction so the inlet and exhaust sides face clear paths. This helps the fan push air where you need cooling.
- Use vibration-dampening mounts. These reduce noise and keep the fan stable during operation.
- Keep the area around the fan free of obstructions. Wires, walls, or guards can block airflow and lower performance.
- Make sure the mounting holes match the fan’s specifications. This keeps the fan secure and prevents rattling.
- Confirm the electrical polarity and voltage before installation. This protects the fan and your equipment.
- Place fans to create negative pressure zones or closed-loop airflow channels. This boosts cooling and helps you reach optimal performance.
- Perform a final functional check. Watch the fan run and make sure it spins at the expected RPM.
When you mount a fan in a tight space or behind a guard, airflow can drop below the rated maximum airflow. If you block the intake or discharge path with cables or walls, you might see performance drop even more. Improper duct connections can cut air volume by up to 30%. Always check your installation for these issues.
Voltage and Current Compatibility
Before you wire your dc axial fan, you need to check voltage and current specs. If you use the wrong voltage, you risk damaging the fan or losing cooling performance. Here are some tips:
- DC axial fans for solar systems must handle wide voltage swings. If your fan isn’t designed for this, it could fail.
- Standard 12V dc fans can burn out if you connect them to a solar panel that puts out 18V or more in full sun.
- Fans made for wide input voltage, like 7V to 24V, work best for direct solar connections.
- If you run a 12V fan at 24V, it will likely burn out fast. If you run a 24V fan at 12V, it may spin too slowly or not at all. This means you won’t get enough cooling or optimal performance.
Always check the datasheet for your fan. Make sure your power supply matches the voltage and current ratings. This protects your fan and keeps your cooling system working.
Performance Checks
After installation, you need to check the fan’s performance. This helps you spot problems early and keeps your system safe. Here’s what you can do:
- Watch the fan spin. Make sure it runs smoothly and doesn’t wobble.
- Listen for strange noises. If you hear rattling or buzzing, check the mounting and wiring.
- Use a tachometer or monitoring system to check RPM. This shows if the fan delivers optimal performance.
- Feel the airflow. If it seems weak, check for obstructions or voltage issues.
- Check the temperature in your system. If things get too hot, you may need to adjust the fan placement or upgrade your cooling setup.
Good installation and regular performance checks help you get the most out of your dc axial fan. You keep your equipment cool and avoid costly repairs.
Safety Precautions
When you wire a DC axial fan, safety comes first. You want to avoid shocks, prevent damage, and keep your equipment running smoothly. Let’s go through the most important steps you should follow.
Electrical Safety
You should always follow industry standards like CE, UL, and CCC when working with DC axial fans. These standards mean the fans have passed tough tests for safety and performance. If you use fans that meet these standards, you lower the risk of electrical problems, especially in places like telecom rooms or server racks.
Before you start, turn off the main power supply. Never work on live wires. Use insulated tools and wear rubber-soled shoes for extra protection. Always check the electrical polarity before you connect anything. If you mix up the wires, you could cause a short circuit or even damage your fan.
Here’s a quick table to help you remember the key steps for safe installation:
| Step | Description |
|---|---|
| 1 | Ground the fan to prevent electrical shock hazards. |
| 2 | Connect the fan’s ground wire to the building’s grounding system. |
| 3 | Install a thermal overload device to shut off power if the motor overheats. |
| 4 | Use a safety disconnect switch rated for your fan’s voltage and amperage. |
| 5 | Turn off the main power and make sure all connections are tight. |
Tip: Always double-check your work before turning the power back on. A quick check can save you from big problems later.
Preventing Damage
You want your fan to last a long time. Most damage happens because of overheating, blocked airflow, or wiring mistakes. If you block the fan’s intake or exhaust, it can overheat fast. Running the fan at high speeds for too long or using the wrong wiring can also cause trouble.
- Make sure nothing blocks the airflow around your fan.
- Keep the fan clean and check it for dust or debris.
- Use the right wiring practices and never force wires into place.
- Add polarity protection if your system allows it.
If you hear strange noises or see the fan slow down, turn off the power and inspect it right away. Regular checks help you catch problems before they get worse.
Handling Power Sources
When you handle DC power sources, you need to stay alert. Always turn off the power before you touch the fan blades. This keeps you safe from sudden starts that could hurt your fingers.
- Wire the fan’s power lines in parallel, not in series with other devices.
- Use circuit-breaker fuses on the power supply lines. This protects your fan and other equipment from short circuits.
- Never drop the fan. Even a small fall can mess up the balance of the blades or bearings.
- When you use screws to mount the fan, keep the torque under 4Kgf. Too much force can crack the fan housing.
Alert: If you ever feel unsure about wiring or power, stop and ask for help. It’s better to be safe than sorry.
By following these safety steps, you protect yourself, your fan, and your whole system. Always check the voltage, confirm the polarity, and use the right tools for the job.
Troubleshooting DC Axial Fan Wiring
Common Wiring Issues
You might run into problems when you install a DC axial fan. Some issues pop up more often than others. If your fan doesn’t spin or seems weak, check these trouble spots first:
- Power isn’t connected or the voltage is too low. The fan needs enough voltage to start, usually 12V, 24V, or 48V DC.
- Broken or loose wiring. Wires can break or lose contact, stopping the fan from working.
- Connectors are rusty or not sturdy. Rust or weak connectors can block power and cause the fan to fail.
- Damaged wires or corroded voltage lines. Look for cracks, cuts, or signs of corrosion.
If you see any of these problems, fix them before you try anything else. Most fans work fine once you sort out these basic issues.
Diagnosing Problems
You want to find out what’s wrong with your fan. Start by checking the wires and their functions. Here’s a simple table to help you test each wire:
| Wire Color | Function | What to Check |
|---|---|---|
| Red | Positive (+) | Should have the fan’s rated DC voltage (like +12V). |
| Black | Ground (–) | Use as your reference for all voltage measurements. |
| Yellow | Tachometer | Outputs pulses. Make sure the connection is secure. |
| Blue | PWM Control | Receives a signal. Look for a changing or steady voltage. |
Grab a multimeter and test the red wire for the correct voltage. Use the black wire as your ground. If you have a 3-wire or 4-wire fan, check the yellow wire for a pulse signal. The blue wire should show a signal if your controller sends PWM. If you don’t see the right readings, you may have a wiring problem.
Try swapping out connectors or cleaning rusty contacts. Sometimes, a quick fix gets your fan spinning again.
When to Consult Datasheets
Sometimes, you can’t solve the problem with basic checks. Maybe the wire colors don’t match the usual pattern. Maybe your fan still won’t spin after you fix the wiring. This is when you need to look at the datasheet.
- The datasheet tells you the exact wire functions and voltage ratings.
- You’ll find diagrams that show how to connect each wire.
- If you see unusual colors or extra wires, the datasheet explains what they do.
- Manufacturer instructions help you avoid mistakes and protect your equipment.
If you feel stuck, don’t guess. Grab the datasheet or contact the manufacturer. You’ll save time and avoid damage.
Troubleshooting a dc fan doesn’t have to be hard. Start with the basics, use your tools, and check the datasheet if things get tricky. You’ll get your fan working and keep your system cool.
Conclusion
You now understand how to wire dc axial fans with 2, 3, or 4 wires. Always look at the wire colors before you begin. Make sure the polarity and voltage are correct. Follow the manufacturer’s wiring diagram for each fan. Do a final check to see if the fan works right. This keeps your dc axial fan safe and working well. Checking datasheets helps you find special features like overload protection and sealing:
| Safety Feature | Benefit |
|---|---|
| Overload Protection | Stops damage if something blocks the fan. |
| Low Voltage Cutoff | Keeps circuits safe from low voltage problems. |
| Environmental Sealing | Protects the fan from dust and water. |
If you need help, contact us. Our team can give you engineering tips and troubleshooting help. You get quick answers and your system keeps working well.
FAQ
How do I know which wire is positive or negative on my DC axial fan?
You can check the wire colors. Red usually means positive. Black means negative. If you see other colors, look at the datasheet or labels. Never guess. You can also use a multimeter to test the wires.
Can I control the speed of a 2-wire DC axial fan?
No, you cannot control the speed directly. A 2-wire fan runs at full speed when powered. If you want speed control, you need a 4-wire fan with a PWM input.
What happens if I reverse the polarity when wiring my fan?
If you swap the wires, your fan may not spin. You could damage the fan or your device. Always double-check the polarity before turning on the power.
Why does my 3-wire fan have a yellow wire?
The yellow wire is for the tachometer signal. It lets you monitor the fan’s speed. You can connect it to a system that reads RPM or fan status.
Can I use a 12V fan with a 24V power supply?
No, you should not do this. Supplying too much voltage can burn out the fan quickly. Always match the fan’s voltage rating with your power supply.
How do I connect the PWM wire on a 4-wire fan?
Connect the blue PWM wire to your controller’s PWM output. This wire lets you adjust the fan speed. Make sure your controller supports PWM signals.
What should I do if my fan makes noise or vibrates?
Check the mounting and wiring. Make sure nothing blocks the airflow. Tighten any loose screws. Clean dust from the blades. If the noise continues, the fan may need replacing.
Where can I find the wiring diagram for my fan?
You can find the wiring diagram in the fan’s datasheet or user manual. If you cannot find it, contact the manufacturer for help.