Ever wondered if you can plug 3 pin fans into 4 pin connectors? The answer is yes, but there are some things to keep in mind. Many industrial systems still use 3 pin fans because they are simple and cost-effective. These fans adjust speed by changing voltage, which works for most setups, though it is not as precise as newer options. Knowing how these fans work can help you make the right choice for your PC or industrial project.
Key Takeaways
- You can safely connect 3 pin fans to 4 pin headers without damage. The extra pin remains unused.
- Expect 3 pin fans to run at full speed when connected to 4 pin headers. This may increase noise levels.
- Check your motherboard manual for DC mode support. This feature allows voltage adjustments for fan speed control.
- Consider upgrading to a 4 Pin PWM Fan for quieter operation and better speed control. These fans adjust speed based on cooling needs.
- Regularly clean your fans and check connections to maintain optimal performance and prevent issues.
Quick Answer for 3 Pin Fans and 4 Pin Connectors
Are 3 Pin Fans Compatible?
Yes, you can plug 3 pin fans into 4 pin connectors. Most modern motherboards and fan controllers are designed to accept both types. The connectors line up perfectly, so you do not need to force anything or use adapters. Many users have connected 3 pin fans to 4 pin headers without any problems. Some motherboards even let you control 3 pin fans using DC mode, which adjusts the voltage to change the fan speed.
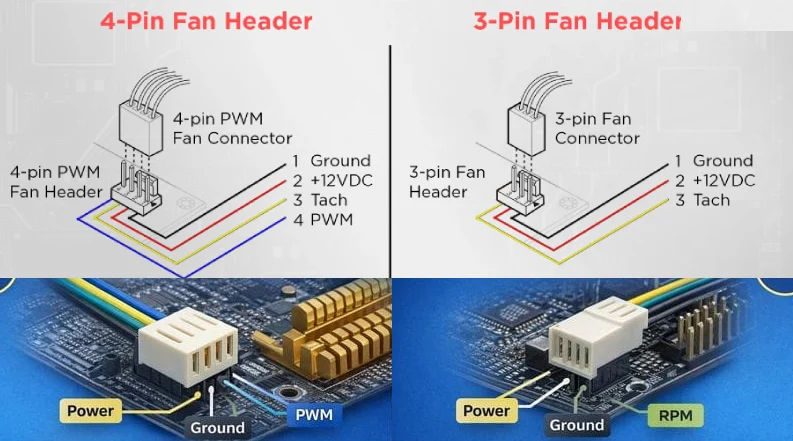
Here’s a quick look at the pin differences:
| Connector Type | Pin 1 | Pin 2 | Pin 3 | Pin 4 (only for 4 pin) |
|---|---|---|---|---|
| 3 Pin | Power | Ground | Tachometer (RPM signal) | N/A |
| 4 Pin | Power | Ground | Tachometer (RPM signal) | PWM Control |
Tip: Always check your motherboard manual to see if it supports DC mode for 3 pin fans on 4 pin headers.
What Happens When You Plug In?
When you connect a 3 pin fan to a 4 pin header, the fan will usually start spinning right away. The connection is safe, and you do not risk damaging your fan or motherboard. However, there are a few things to keep in mind:
- The fan will run at a fixed speed, often at maximum, because it cannot use the PWM signal from the fourth pin.
- You might hear more noise, especially if the fan is running at full speed all the time.
- Some motherboards allow you to adjust the speed by changing the voltage, but not all do.
- If your system supports DC mode, you may still have some control over the fan speed.
Most users find that 3 pin fans work just fine in 4 pin headers, especially for basic cooling needs.
Key Limitation: No PWM Speed Control
The biggest limitation is the lack of PWM (Pulse Width Modulation) speed control. PWM lets a fan change its speed quickly and smoothly, based on how much cooling your system needs. Without PWM, 3 pin fans cannot adjust their speed automatically. They run at a constant speed, which can lead to a few issues:
- The fan may be louder than you want, especially when your system is not hot.
- The fan cannot ramp up speed when your system gets warmer, which could affect cooling performance.
- You may need to adjust the voltage manually if you want to change the speed.
Note: PWM control is only possible with 4 pin fans. If you want quiet operation and smart speed control, consider upgrading to a 4 Pin PWM Fan from fanacdc.
3 Pin vs 4 Pin Fan Connectors Explained
3 Pin Fans: How They Work
Let’s start with the basics. 3 pin fans are simple and reliable. They use three wires to connect to your motherboard or controller. Here’s what each pin does:
| Pin Number | Function |
|---|---|
| 1 | Ground |
| 2 | +12 VDC power |
| 3 | Tachometer (speed signal) |
The speed of 3 pin fans changes when you adjust the voltage on Pin 2. If you lower the voltage, the fan spins slower. If you raise it, the fan spins faster. This method is like using a dimmer switch for a light. It’s easy, but if the voltage drops too low, the fan might stop and won’t restart until you turn the voltage back up. These fans need a controller that can handle DC speed control.
4 Pin PWM Fan by fanacdc
Now, let’s talk about 4 pin fans, especially the 4 Pin PWM Fan from fanacdc. This fan uses advanced technology to give you more control and better performance. Here’s a quick comparison:
| Feature | fanacdc’s 4 Pin PWM Fan | Standard 4 Pin Fan |
|---|---|---|
| Control Method | PWM signal manipulation | Voltage regulation |
| Speed Stability | Smooth at low speeds | May stall at low voltage |
| Noise Levels | Quiet, gradual adjustments | Can fluctuate |
| Lifespan | Longer due to efficiency | Standard |
| Initial Cost | Higher for advanced features | Lower |
The fanacdc 4 Pin PWM Fan uses a PWM signal for speed control. This means the fan can run quietly and smoothly, even at low speeds. It also lasts longer and uses energy more efficiently.
Fan Speed Control Methods
There are two main ways to control fan speed:
- Voltage control (used by 3 pin fans): Changes the power sent to the fan. Simple, but not always precise.
- PWM control (used by 4 pin fans): Sends quick pulses of power to the fan. This method keeps the fan running smoothly and quietly, even at low speeds.
PWM technology helps fans adjust their speed based on how much cooling your system needs. This means less noise, better energy savings, and reliable cooling. It’s a smart choice for modern PCs, data centers, and industrial systems.
Tip: If you want quiet operation and precise temperature management, a 4 Pin PWM Fan like the one from fanacdc is a great upgrade.
How to Plug 3 Pin Fans into 4 Pin Headers Safely
Step-by-Step Connection Guide
Connecting 3 pin fans to a 4 pin header is easy if you follow a few simple steps:
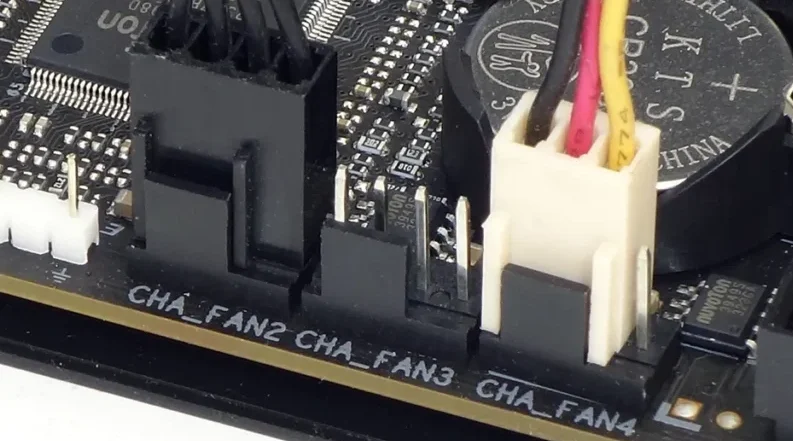
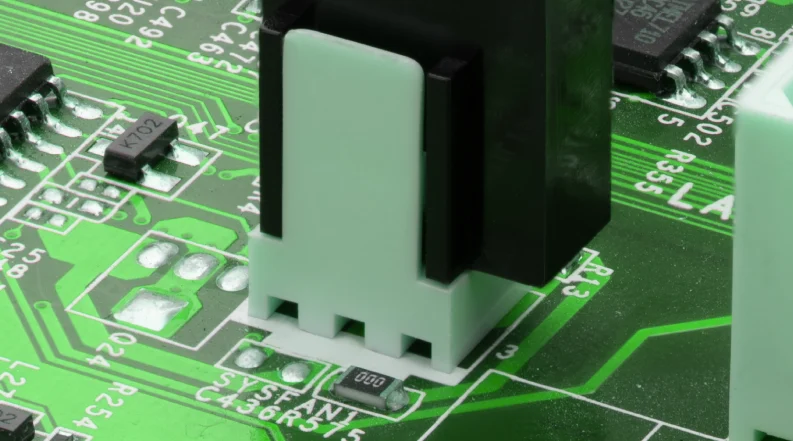
- Align the fan connector with the header on your motherboard. The ridges on the connector should match the plastic guide on the header.
- Gently push the connector onto the header. It should fit snugly without much force.
- Plug the fan into a header labeled “CPU Fan” for the best results. This header is designed for main cooling and usually offers the best control.
- Double-check that the connector is secure and the wires are not loose.
Tip: Avoid using headers labeled “W_PUMP,” “H_AMP,” or “M.2_FAN.” These are made for other types of fans and can cause extra noise or even damage.
Best Practices and Tips
Want your fan to run smoothly? Here are some quick tips:
- Always check your motherboard manual before connecting anything. This helps you find the right header and avoid mistakes.
- Make sure the fan wires are straight and not pinched. This keeps the connection safe and reliable.
- If you want to control fan speed, look for BIOS settings that support DC mode. Not all motherboards offer this, but it can help you adjust how fast your fan spins.
- Clean the fan and header area before installation. Dust can block connections and reduce cooling.
Common Mistakes to Avoid
Many users make small errors when connecting 3 pin fans to 4 pin headers. Here are the most common ones:
- Plugging the fan into the wrong header, which can lead to noise or poor performance.
- Forcing the connector, which may damage the header or the wires.
- Not checking if the wire is seated correctly in the header.
- Expecting full speed control through BIOS when the fan lacks the right circuit for it.
- Forgetting that 3 pin fans do not support PWM speed control, so some BIOS options will not work.
Remember, taking a few extra seconds to check your connections can save you a lot of trouble later!
Performance and Control: What to Expect
Fan Speed and BIOS Settings
When you connect 3 pin fans to a 4 pin header, the fan will spin as soon as you power on your system. The fourth pin, which controls PWM, is not used by 3 pin fans. This means the fan may run at full speed by default. If you want to slow it down, you need to check your BIOS settings. Some motherboards let you switch the fan header to DC mode. This setting allows the system to control fan speed by changing the voltage. If your motherboard does not support DC mode, the fan will keep running at its highest speed, which can be noisy.
Tip: Always look for the fan control section in your BIOS. Switching to DC mode can help you get quieter operation from your 3 pin fans.
When to Upgrade to 4 Pin PWM Fan
If you want more control over your cooling and noise, it might be time to consider a 4 Pin PWM Fan from fanacdc. These fans use pulse-width modulation for speed control, which means they can run quietly at low speeds and ramp up only when needed. You get smoother performance, less noise, and better energy efficiency. The fanacdc 4 Pin PWM Fan also offers real-time RPM monitoring and is perfect for gaming PCs, workstations, and industrial systems where precise cooling matters.
Here’s a quick comparison:
| Feature | 3-Pin Fans | 4-Pin Fans |
|---|---|---|
| Speed Control | Voltage regulation | Pulse-width modulation (PWM) |
| Efficiency at Low Speeds | Less efficient, may stall | More efficient, stable performance |
| Noise Level | Can be noisier at lower speeds | Quieter operation at lower RPMs |
| Compatibility | Can be plugged into 4-pin headers | Can run at full speed on 3-pin headers |
Real-World Scenarios
Let’s look at some real-life examples:
- In a basic office PC, 3 pin fans usually do the job. They keep things cool, but you might hear them running all the time.
- In a gaming PC or server, 4 pin PWM fans shine. They adjust speed based on temperature, so your system stays quiet when idle and cool under load.
- For industrial setups, fanacdc’s 4 Pin PWM Fan offers reliable, quiet, and efficient cooling, even in demanding environments.
- 3-pin fans adjust speed by changing voltage, which can lead to uneven performance at low speeds.
- 4-pin fans use PWM to control speed, giving you smoother, quieter, and more reliable cooling.
Note: If you want the best balance of noise and cooling, upgrading to a 4 Pin PWM Fan is a smart move.
Troubleshooting and Advanced Tips
Using Splitters and Hubs
Adding more fans to your system can seem like a good idea, but using splitters and hubs brings its own set of challenges. Here are some common issues you might face:
- Power limitations can happen if you connect too many fans to a single header. The header may not supply enough power, which can cause fans to run slower or not at all.
- The PWM signal can weaken when you connect several fans. This may lead to fans spinning at different speeds or not responding to speed changes.
- Compatibility can be tricky. Mixing 3 pin and 4 pin fans on the same splitter or hub often means you lose precise speed control, especially for the 3 pin fans.
Safety in Industrial Systems
Safety matters a lot in industrial and commercial setups. Fans often run for long hours in tough environments. Make sure you use fans that match your system’s voltage and current needs. Secure all connections to avoid loose wires, which can cause short circuits or system failures. Regularly inspect fans for dust buildup or signs of wear. Clean and replace them as needed to keep your equipment safe and cool.
For critical systems, consider using fans with built-in protection features, such as thermal cutoffs or IP-rated enclosures.
Getting the Most from fanacdc Fans
fanacdc fans offer advanced features that help you get the best cooling and efficiency for your setup. Here’s a quick look at what sets them apart:
| Feature | Description |
|---|---|
| Smart Speed Control | Lets you fine-tune fan speed for better cooling and energy savings. |
| Energy-Saving Design | Uses less power while still keeping your system cool and reliable. |
| DC Fans | Run quietly and need little maintenance, perfect for sensitive equipment. |
| EC Fans | Blend AC and DC tech for smart airflow and up to 30% energy savings. |
Try adjusting your fan settings in your BIOS or controller to take full advantage of these features. With the right setup, you can enjoy quiet, efficient, and reliable cooling for any application.
Here’s what you need to remember about 3 pin fans and 4 pin connectors:
- You can connect 3 pin fans to 4 pin headers, but you won’t get PWM speed control. The fan will run at full speed, which might be noisy.
- Picking the right fan boosts airflow and keeps your system running longer. Regular cleaning and inspections help prevent problems.
- If you want quieter operation and precise control, check out fanacdc’s 4 Pin PWM Fan. Take a look at the benefits:
| Benefit | Description |
|---|---|
| Precise Speed Control | Efficient cooling without wasting energy |
| Quieter Operation | Lower noise, perfect for sensitive spaces |
| Longer Fan Life | Smooth transitions extend lifespan |
| Enhanced Airflow | High static pressure for better performance |
| Energy Efficiency | Cuts power consumption by up to 30% |
Keep your fans clean, monitor performance, and follow safety tips for the best results.
FAQ
Can I plug a 3 pin fan into any 4 pin header?
Yes, you can. The connectors are designed to fit together. Just line up the grooves and push gently. Most motherboards support this setup.
Will my 3 pin fan get damaged in a 4 pin connector?
No worries! Plugging a 3 pin fan into a 4 pin header is safe. The extra pin just sits unused. Your fan will work as usual.
How do I control the speed of a 3 pin fan on a 4 pin header?
You can adjust speed if your motherboard supports DC mode. Check your BIOS settings for fan control options. Not all boards have this feature.
What’s the main benefit of upgrading to a 4 Pin PWM Fan from fanacdc?
You get quieter operation, smarter speed control, and better energy savings. fanacdc’s 4 Pin PWM Fan adjusts speed automatically for top performance.
Can I mix 3 pin and 4 pin fans on the same splitter?
You can, but only the 4 pin fans will use PWM control. The 3 pin fans will run at a fixed speed or use voltage control if supported.
Conclusion
While 3 pin fans can work reliably in 4 pin headers, they are ultimately a basic solution for basic cooling needs. You get compatibility, but you sacrifice precision, noise control, and energy efficiency—factors that become critical in modern industrial systems, electrical cabinets, and high-performance equipment.
If your application demands stable airflow, lower noise, and intelligent thermal management, upgrading to a 4-pin PWM solution is the smarter long-term choice. At fanacdc, we design and manufacture industrial-grade AC, DC, and PWM fans that deliver consistent performance, extended lifespan, and optimized energy use across demanding environments.
Whether you are sourcing for bulk procurement, engineering projects, or system integration, choosing the right fan is not just about cooling—it’s about protecting your equipment, reducing maintenance costs, and improving overall system reliability.